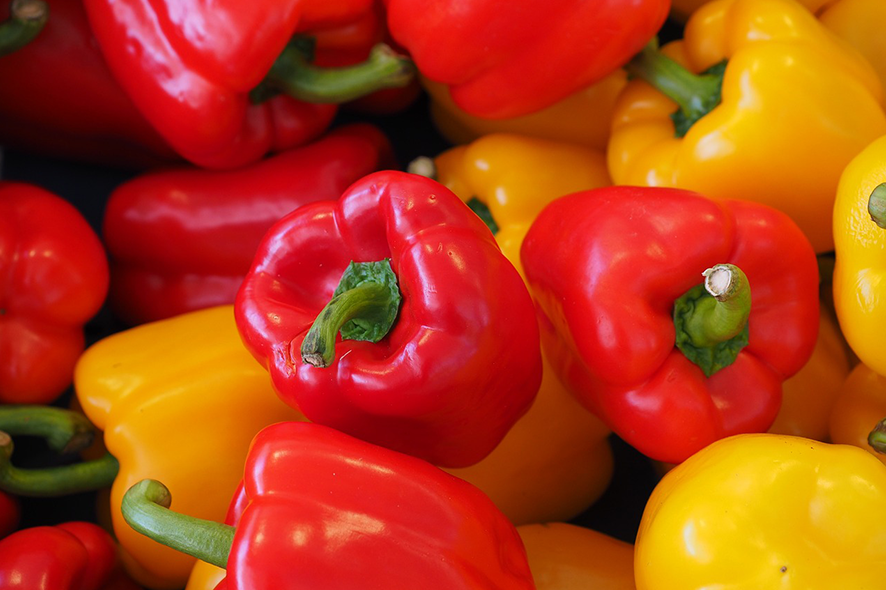
Bell peppers are an essential plant in vegetable gardens, loved for both their taste and nutritional benefits.
Growing Bell Peppers – The Unmistakable Taste of Summer 🌶️
They can be grown in various varieties, from sweet peppers, perfect for salads and various dishes, to hot peppers, which add a unique flavor to food. Bell peppers are easy to grow but require a few specific conditions to thrive and yield abundant harvests.
🌱 Why Grow Bell Peppers?
- ✅ Variety of types: You can choose from sweet peppers, hot peppers, or even large pepper varieties.
- ✅ Intense flavor: Bell peppers add flavor to dishes, whether they are raw, grilled, or pickled.
- ✅ Nutritional benefits: Rich in vitamins A and C, antioxidants, and fiber, bell peppers are a healthy addition to your diet.
- ✅ Easy to grow: Bell peppers are relatively easy to cultivate, especially in sunny spots.
🌍 Soil and Light Requirements
- ☀️ Sunlight: Bell peppers thrive in sunny, warm locations, ideally getting at least 6 hours of direct sunlight each day.
- 🌱 Soil: They need well-drained soil, slightly acidic to neutral, with a pH between 6.0 and 6.8. Fertile, moisture-retaining soil is ideal for growing peppers.
- 💧 Watering: It’s important to keep the soil moist but not waterlogged. Regular watering is essential, especially during the active growth period.
🧑🌾 Preparing the Soil
- ♻️ Fertilize the soil: Before planting, enrich the soil with organic compost or fertilizers to provide nutrients for healthy growth.
- 🧹 Weed removal: Clear the soil of any weeds or debris to give your peppers the best environment to grow.
- 🧪 Check pH: If the soil is too acidic, add a bit of wood ash to balance the pH.
🌱 Planting Bell Peppers
- 📆 When to plant: Bell peppers are typically planted after the last frost, around May or early June, when the soil temperature reaches around 20°C.
- 🌰 How to plant: Dig holes about 10 cm deep, spacing the plants 30–40 cm apart and leaving 50–60 cm between rows. Plant the peppers with their roots facing down, ensuring the plant is placed at a slight elevation from the soil for optimal growth.
- 💧 After planting: Water gently and regularly to keep the soil moist but not soggy.
🧰 Caring for Bell Peppers
- 💧 Regular watering: Bell peppers need consistent watering. Be sure to avoid over-watering, but ensure the soil stays slightly moist at all times.
- 🌿 Pest control: Peppers are sensitive to pests and diseases. Use natural methods like handpicking pests or spraying with water and soap to protect your plants.
- 🌾 Companion planting: Try planting peppers alongside tomatoes, basil, or cabbage to protect them from pests and help each other thrive.
- 🌱 Fertilization: Fertilize your peppers once a month with a balanced vegetable fertilizer to support their growth.
🌼 Harvesting Bell Peppers
- ⏳ When to harvest: Bell peppers are ready to harvest when they reach the desired size and color (green, yellow, red, depending on the variety). While they can be harvested while still green, waiting until they fully mature provides the best flavor.
- ✂️ How to harvest: Use garden shears or a knife to cut the pepper from the plant, leaving a small portion of the stem attached to avoid damaging the plant.
- 🌾 Storage: Bell peppers can be stored in the fridge for 1–2 weeks. They can also be frozen or preserved in jars to enjoy throughout the year.
✅ Conclusion
Bell peppers are easy-to-grow, nutritious plants that add amazing flavor to your dishes. With minimal care, you can enjoy a vibrant and tasty harvest year-round.
🌶️ Health Benefits of Peppers
-
🛡️ Boosts Immunity
Peppers, especially red ones, are extremely rich in vitamin C – even more than citrus fruits! Vitamin C helps fight infections, stimulates collagen production, and accelerates wound healing. -
👁️ Supports Eye Health
Peppers contain beta-carotene, lutein, and zeaxanthin, antioxidants that protect vision and prevent age-related macular degeneration. -
❤️ Protects the Heart
Peppers have antioxidant compounds that reduce inflammation and help regulate blood pressure and cholesterol levels. Hot peppers, due to capsaicin, can improve circulation and reduce the risk of cardiovascular diseases. -
⚖️ Aids in Weight Loss
Low in calories but high in fiber, peppers provide satiety without adding a lot of energy. Capsaicin in hot peppers boosts metabolism and helps burn fat. -
🧠 Stimulates the Brain and Well-Being
Vitamin B6 and magnesium in peppers support the proper functioning of the nervous system, while capsaicin stimulates the release of endorphins – the "happiness" hormones. -
🧬 Has Antioxidant and Anti-inflammatory Effects
Peppers are packed with antioxidants like vitamins C, A, and flavonoids, which help fight oxidative stress and inflammation in the body.
🍽️ How to Include Peppers in Your Diet:
- Raw, in salads or sandwiches 🥗🥪
- Roasted, in pepper salad or hummus 🌶️🧆
- Stuffed (stuffed peppers) or in stews 🍲
- In sauces, zacusca, or pickles 🍅
- In the form of sweet or hot paprika, in cooked dishes 🍛
🧑🍳 Delicious Recipes with Peppers
🌶️ Stuffed Peppers (Traditional Romanian)
A classic and comforting dish, stuffed peppers are among the most beloved meals in Romanian cuisine. Filled with meat, rice, and enticing aromas, then cooked in a savory tomato sauce, the peppers become tender and full of flavor. Served warm, with sour cream and homemade bread – a true culinary delight!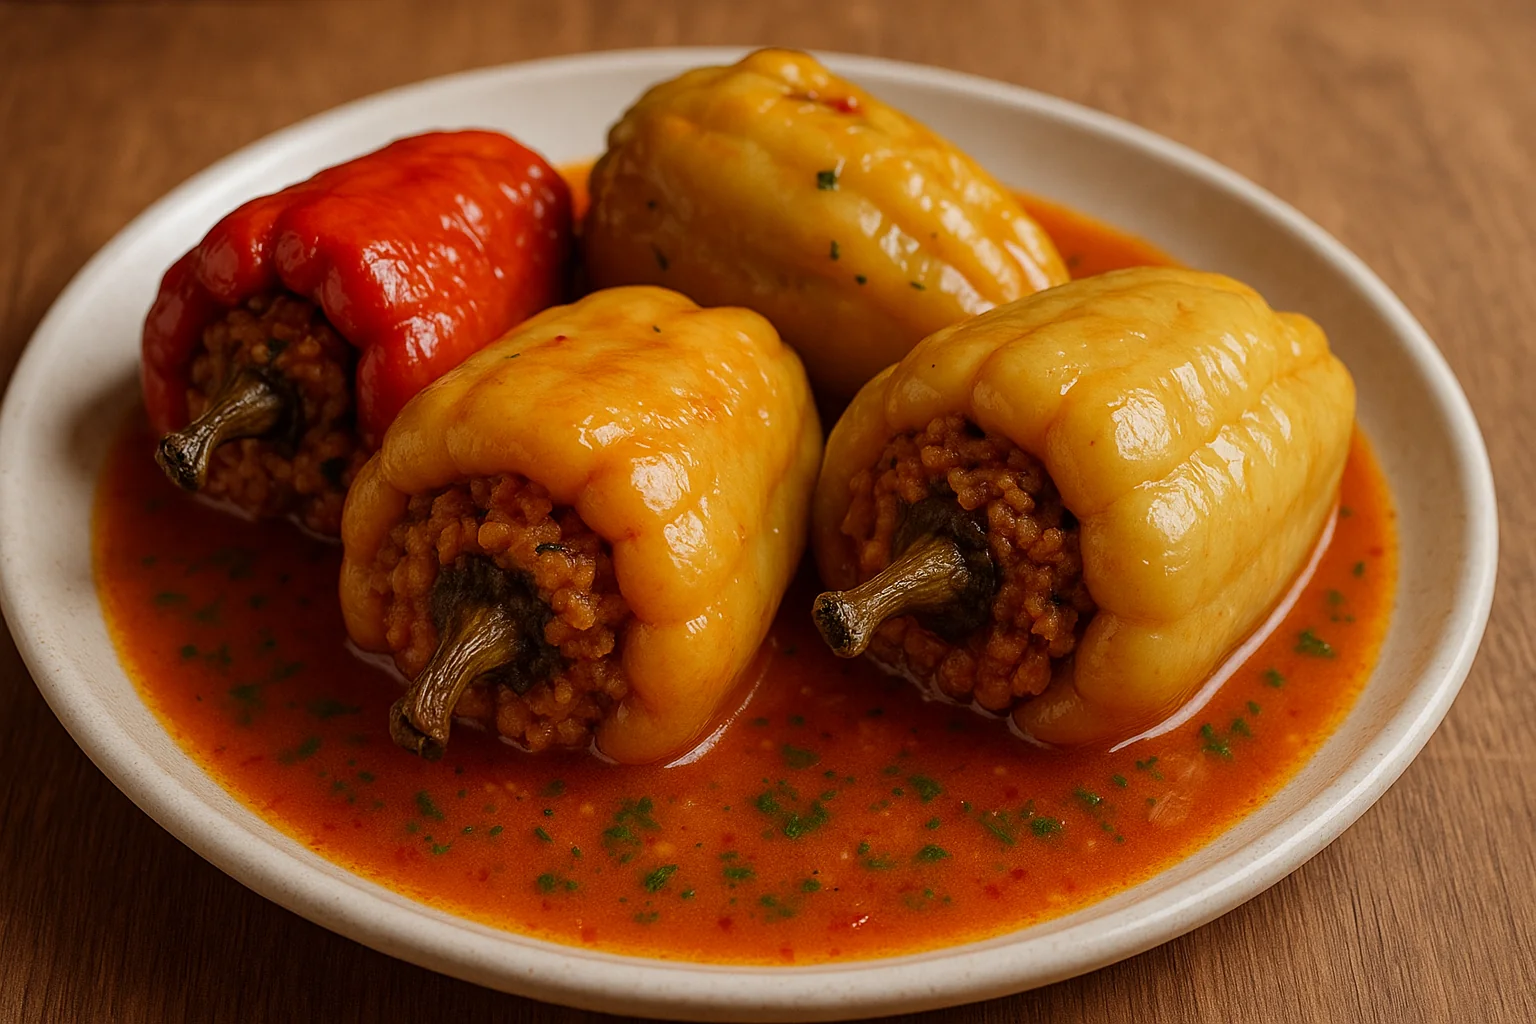
🛒 Ingredients
🫑 6-8 bell peppers (preferably yellow or red, as straight as possible)
🥩 500 g minced meat (pork, beef, or a mix)
🍚 100 g rice
🧅 1 large onion, finely chopped
🍅 500 ml tomato juice or crushed tomatoes
🧄 1-2 cloves of garlic (optional)
🧂 Salt, pepper
🌿 Thyme, bay leaves
🥄 2 tablespoons tomato paste
🫒 2-3 tablespoons oil
🌿 Fresh parsley, chopped
💧 Water (for boiling)
👩🍳 Preparation:
1. Cut the roasted peppers into strips or leave them whole, according to your preference.
2. Place them in a bowl and add the finely chopped (or crushed) garlic.
3. In a separate bowl, mix the oil, vinegar, salt, and a little water. Pour the vinaigrette over the peppers and stir gently.
4. Let the salad chill for at least 30 minutes before serving – the flavors will blend beautifully.
🍽️ Serving Suggestions:
- Serve alongside steak, grilled fish, or roasted potatoes.
- With feta cheese and tomatoes, in a rustic salad.
- On toasted bread, with a drizzle of flavored oil and coarse salt.
🫑 Roasted Pepper Salad
Roasted pepper salad is one of the simplest yet most flavorful and aromatic dishes in Romanian cuisine. The sweet and slightly smoky taste of the roasted peppers, drizzled with vinegar, oil, and garlic, brings a refreshing touch to any meal. It is served cold, as a side dish with meat, potatoes, cheese, or even on its own with fresh bread.
🛒 Ingredients:
- 🫑 6–8 kapia or bell peppers (red or yellow)
- 🧄 1–2 garlic cloves (optional, for a subtle flavor)
- 🫒 3–4 tablespoons oil (sunflower or olive oil)
- 🍾 2–3 tablespoons vinegar (white wine or apple cider)
- 🧂 Salt to taste
- 💧 1–2 tablespoons water (to dilute the vinaigrette, if needed)
🔥 How to roast the peppers:
- Grill them, bake in the oven (220°C for 30–40 min), or roast directly over a flame until the skin blackens and starts to peel off easily.
- Place the peppers in a bowl, cover with a lid or plastic wrap, and let them “sweat” for 10–15 minutes. This makes peeling easier.
- Carefully peel off the skin, remove the stems and seeds—avoid washing them with water, as it will wash away the flavor!
👩🍳 Preparation:
- Cut the roasted peppers into strips or leave them whole, as preferred.
- Place them in a bowl and add the finely chopped or crushed garlic.
- Separately, mix the oil, vinegar, salt, and a little water. Pour the vinaigrette over the peppers and stir gently.
- Let the salad chill for at least 30 minutes before serving – this helps the flavors blend beautifully.
🍽️ Serving Suggestions:
- As a side dish with roast meat, grilled fish, or baked potatoes.
- With feta cheese and tomatoes in a rustic salad.
- On toasted bread, with a drizzle of flavored oil and coarse salt.
🌮 Quesadilla with peppers and cheese
Quesadilla is a versatile and tasty Mexican dish, and the version with peppers and cheese is perfect for a light lunch, a quick dinner, or even a warm snack. Roasted or sautéed peppers add sweetness and color, while the melted cheese ties everything together into a comforting and savory dish.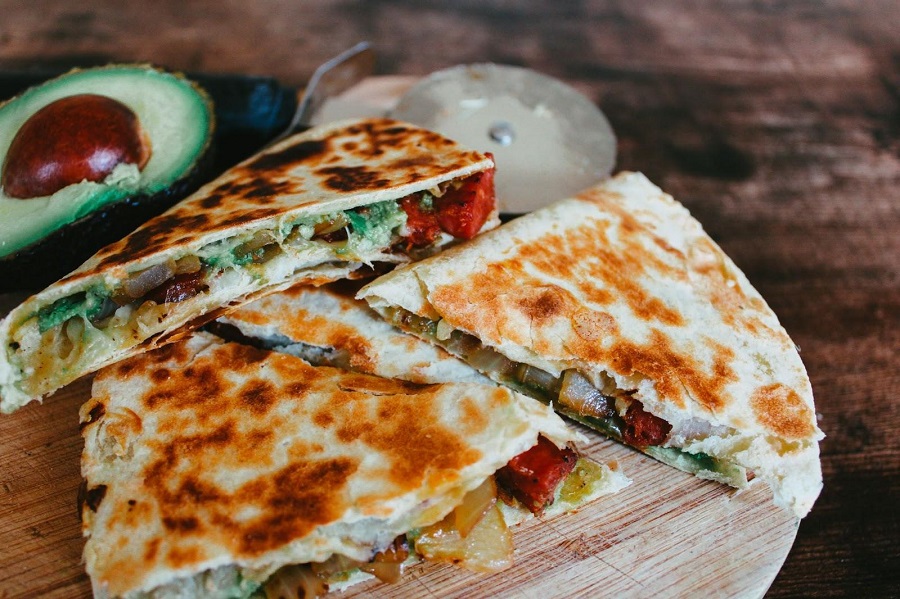
🛒 Ingredients (for 2 large quesadillas):
- 🌯 2 large flatbreads (wheat or corn tortillas)
- 🫑 1 red bell pepper (or yellow), sliced thinly
- 🧅 1 small onion, julienned (optional)
- 🧀 150 g cheese (cheddar, mozzarella, gouda, or a combination)
- 🫒 1 tablespoon olive oil
- 🌶️ Optional: chili pepper, corn, mushrooms, fresh coriander
- 🧂 Salt, pepper to taste
👩🍳 Preparation:
- Sauté the vegetables: Heat the oil in a pan and sauté the onion and pepper for 4-5 minutes, until soft and slightly caramelized. Season with salt and pepper.
- Assemble the quesadilla: On one half of the tortilla, sprinkle a little cheese, then add the sautéed peppers and onions. Top with the rest of the cheese and fold the tortilla in half.
- Cook the quesadilla: Place the tortilla in a non-stick pan over medium heat. Cook for 2-3 minutes on each side, until golden brown and the cheese is melted.
- Cut and serve: Remove the quesadilla from the pan, place it on a cutting board, and cut it into triangles.
🍽️ Serving suggestions:
- With guacamole 🥑, sour cream, or Greek yogurt
- With spicy 🌶️ or sweet salsa
- Served alongside a green salad or Mexican rice
🫕 Pepper Stew (Hot Zacusca)
Pepper stew, also known as "hot zacusca," is a simple, vegan dish with a deep flavor of roasted vegetables and spices. It's perfect as a main dish, side, or appetizer, served hot with fresh bread or polenta. This recipe brings the flavors of autumn but is welcome at any time of the year.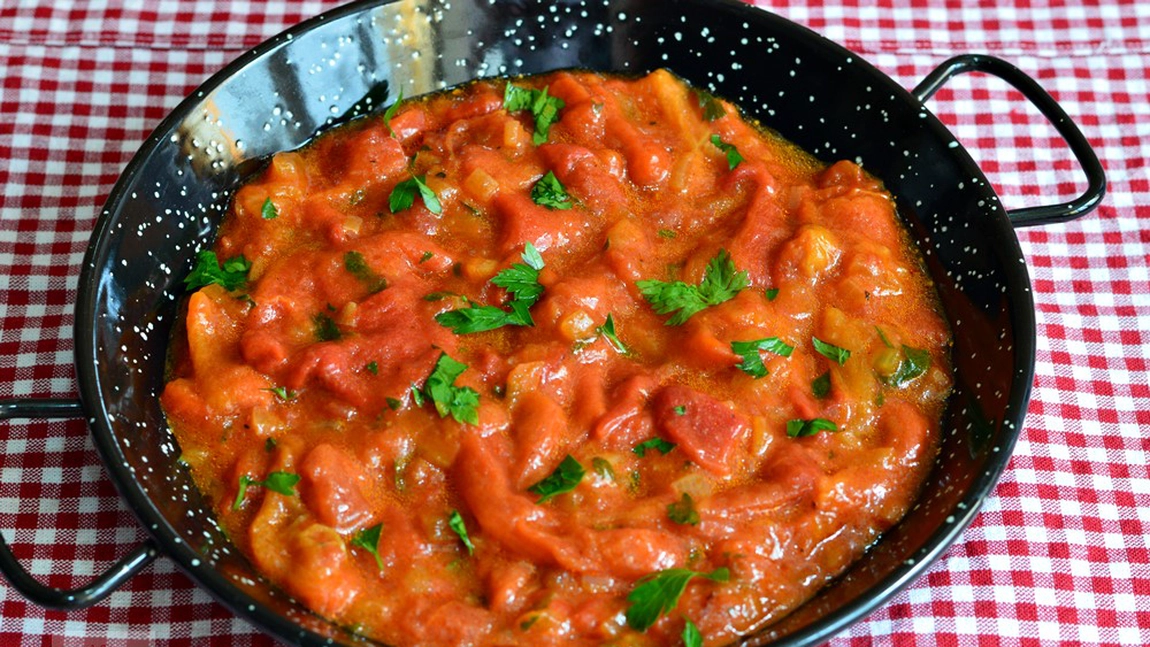
🛒 Ingredients (for 4 servings):
- 🫑 4-5 bell peppers (red, yellow, or green)
- 🍆 1 small eggplant (optional, for an authentic zacusca taste)
- 🍅 3 ripe tomatoes or 250 ml crushed tomatoes
- 🧅 2 large onions, julienned
- 🧄 2 garlic cloves, crushed
- 🫒 3-4 tablespoons oil (sunflower or olive oil)
- 🌿 1-2 bay leaves, thyme, oregano (to taste)
- 🧂 Salt, pepper
- 🌶️ Optional: hot pepper or smoked paprika, for extra intensity
👩🍳 Preparation:
- Prepare the vegetables: Roast the peppers and eggplant (if using), then peel off the skin and remove the seeds. Cut them into strips or cubes. If you're in a hurry, you can sauté the raw peppers, but roasting them adds a richer flavor.
- Sauté the onions: In a pot, heat the oil and add the onions. Cook them on low heat until soft and slightly golden (10-15 minutes).
- Add the vegetables: Add the roasted peppers, chopped eggplant, garlic, and crushed tomatoes. Stir gently.
- Season: Add salt, pepper, bay leaves, and thyme. Simmer on low heat, stirring occasionally, until the sauce thickens and reduces (20-30 minutes).
- Taste and adjust: At the end, taste and add more seasoning if necessary. You can also add a bit of sugar if the tomatoes are too acidic.
🍽️ Serving suggestions:
- With fresh or toasted bread 🥖
- Served with soft or inverted polenta 🌽
- As a side for roasted meat or fried sausages 🍖
- Cold, as a spreadable zacusca on slices of bread
🍳 Shakshuka with Peppers
Shakshuka is a dish originating from the Middle East and North Africa, famous for its simplicity and flavor. Poached eggs in a rich tomato, pepper, and spice sauce make this dish a hearty breakfast or a quick dinner, full of taste and color. The version with peppers adds sweetness and texture, turning it into a comforting culinary experience.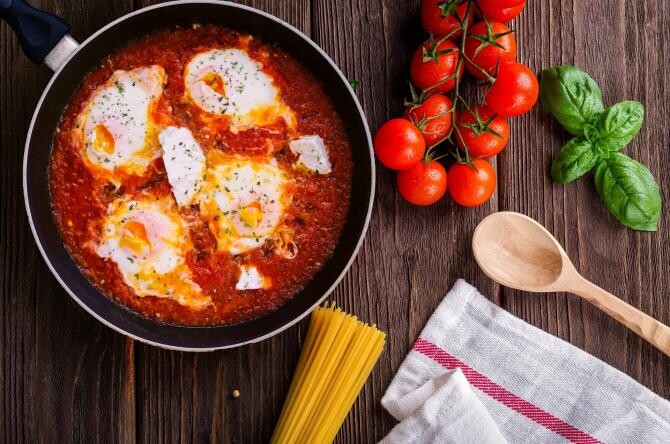
🛒 Ingredients (for 2-3 servings):
- 🫑 1 red bell pepper (or yellow), sliced
- 🍅 400 g chopped tomatoes (canned or fresh peeled)
- 🧅 1 medium onion, finely chopped
- 🧄 2 garlic cloves, crushed
- 🥚 3-4 eggs
- 🫒 2 tablespoons olive oil
- 🌶️ ½ teaspoon sweet paprika (or smoked), optional: a pinch of chili
- 🌿 ½ teaspoon cumin (optional), salt, pepper to taste
- 🌿 Fresh parsley or cilantro for garnish
👩🍳 Preparation:
- Sauté the vegetables: In a large pan, heat the oil and sauté the onion until translucent. Add the sliced pepper and cook for 5-7 minutes until it softens slightly. Add the garlic and spices (paprika, cumin, chili) and mix well.
- Add the tomatoes: Pour the chopped tomatoes into the pan, season with salt and pepper. Simmer on low heat for 10-15 minutes until the sauce reduces and thickens slightly.
- Add the eggs: Use a spoon to make small indentations in the sauce and crack the eggs into them. Cover the pan and cook on low heat for 5-7 minutes, until the whites are set but the yolks remain soft.
- Finishing: Sprinkle fresh parsley or cilantro on top.
🍽️ Serving suggestions:
- With fresh bread or pita to "scoop" the sauce 🫓
- With cold yogurt, crumbled feta cheese, or avocado for extra freshness 🥑
- Chickpeas, mushrooms, or spinach can also be added for a richer version 🌿
🫙 Roasted Peppers in Jars (Preserve)
Roasted peppers preserved in jars are a pantry treasure: their intense, sweet, and slightly smoky flavor adds a taste of summer to any dish, even in the middle of winter. They’re perfect for salads, side dishes, sandwiches, or as a base for sauces and cooked meals. The recipe is simple, without artificial preservatives, yet full of authentic Romanian flavor.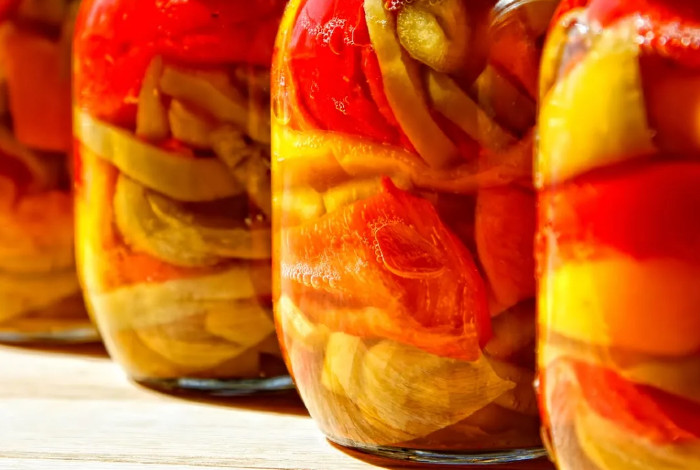
🛒 Ingredients:
- 🫑 4-5 kg of kapia peppers or bell peppers (or a combination)
- 🧄 2-3 garlic cloves (optional, for flavor)
- 🧂 Coarse, non-iodized salt
- 🍷 100 ml vinegar (white wine or apple cider vinegar)
- 💧 300 ml water
- 🍶 100 ml oil (sunflower or olive oil)
- 🌿 Optional: bay leaves, peppercorns, sugar (1 teaspoon for balance)
👩🍳 Preparation:
- Roasting the peppers:
- Roast the peppers on the stove, grill, in the oven, or over coals until the skin blackens.
- Place them in a covered dish or an airtight bag and let them steam for 10-15 minutes – this makes them easier to peel.
- Peel off the skin, remove the stems and seeds. Don’t wash them under running water – just wipe gently if needed.
- Preparing the preserving liquid:
- Boil the water with vinegar, oil, salt, and any optional spices (bay leaves, peppercorns, garlic).
- Let it boil for 2-3 minutes, then remove from heat and let it cool slightly.
- Filling the jars:
- Place the peeled peppers in sterilized jars, pressing lightly, but without crushing them.
- Pour the hot liquid over the peppers, ensuring they are fully covered.
- Seal the jars tightly with well-fitted lids.
- Sterilization (for 100% safety):
- Place the jars in a large pot with a towel underneath them and water that reaches ¾ of the jar’s height.
- Boil for 30-40 minutes from the moment the water starts to boil.
- Carefully remove the jars, wrap them in a blanket, and let them cool slowly, until the next day.
🧊 Storage:
- Store in a cool, dark place for up to 12 months. Once opened, keep in the fridge and consume within 5-7 days.
🥗 Fresh Veggie Salad with Peppers
A fresh, crunchy, and colorful salad, perfect for any season! It combines vibrant textures and flavors, is light and full of vitamins – ideal as a side dish, light lunch, or even a healthy dinner. The pepper adds sweetness, while the other vegetables bring balance and freshness.
🛒 Ingredients (for 2-4 servings):
- 🫑 1 red bell pepper
- 🟢 1 green pepper (or yellow for variety)
- 🥕 1 large carrot
- 🥒 1 fabulous cucumber or ½ long cucumber
- 🧅 ½ red or white onion (optional)
- 🌿 1 handful of fresh parsley, chopped
- 🧂 Salt, pepper to taste
- 🍋 Juice of ½ lemon (or 1 tablespoon apple cider vinegar)
- 🫒 2 tablespoons olive oil
- 🍯 Optional: 1 teaspoon honey for balance
👩🍳 Preparation:
- Prepare the vegetables:
- Slice the bell peppers into thin strips.
- Grate the carrot on a coarse grater or spiralize it.
- Slice the cucumber into thin rounds or sticks.
- Finely julienne the onion, and chop the parsley.
- Assemble the salad:
- Place all the vegetables in a large bowl.
- In a separate bowl, mix the olive oil with lemon juice, salt, pepper, and, if desired, honey.
- Pour the dressing over the vegetables and gently toss.
- Chill for 5-10 minutes before serving – the flavors will meld better.
🍽️ Serving Suggestions:
- Alongside grilled meats or fish (such as halloumi)
- As a base for a quinoa or couscous bowl
- In sandwiches or wraps for a fresh boost
- With croutons or toasted seeds for added texture
🍲 Vegetable Soup with Peppers
A classic, nourishing, and colorful soup, perfect for light lunches or those days when you crave something warm and comforting. The pepper adds sweetness and flavor, while the other vegetables complete a delicious and healthy dish. It can be made simply or enriched with sour cream for extra creaminess.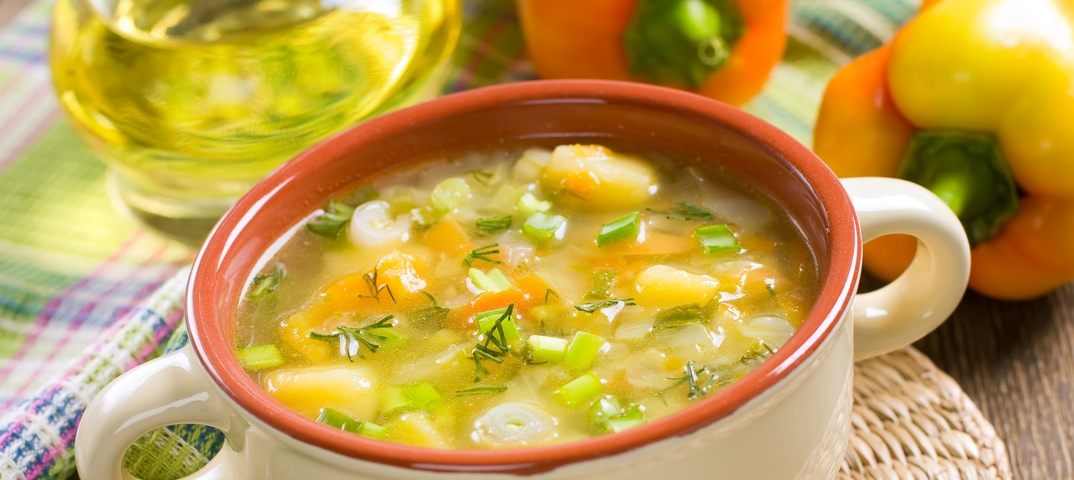
🛒 Ingredients (4-6 servings):
- 🫑 1-2 bell peppers (red, yellow, or green)
- 🥕 2 carrots
- 🥔 2 potatoes
- 🌿 1 parsnip or parsley root
- 🧅 1 onion
- 🍅 2 ripe tomatoes (or 200 ml pureed tomatoes)
- 🥬 ½ small celery root
- 🧄 1 garlic clove (optional)
- 💧 2 L water or vegetable broth
- 🌿 Lovage, fresh parsley (for garnish)
- 🧂 Salt, pepper to taste
- 🍋 Lemon juice or borscht (to sour)
Optional:
- 🌽 100 g peas or corn
- 🥄 1 tablespoon rice (for added consistency)
👩🍳 Preparation:
- Prepare the vegetables:
- Dice the onion, slice the carrots and parsnip, cube the potatoes, slice the peppers, and blanch the tomatoes (or use pureed tomatoes).
- Sauté the onion:
- Gently sauté the onion in a tablespoon of oil (optional), then add the remaining vegetables (except tomatoes) and stir for 2-3 minutes.
- Add the broth:
- Add the water or vegetable broth, cover, and let it simmer for about 20-25 minutes, until the vegetables are tender.
- Add the tomatoes and rice:
- Add the tomatoes or tomato puree, rice (if using), and continue cooking for another 10 minutes.
- Season and sour:
- Adjust the taste with salt and pepper, then sour with borscht or lemon juice as desired. Add the crushed garlic, if you like a mild spicy kick.
- Finish with herbs:
- Sprinkle fresh parsley or lovage on top before serving.
🍽️ Serving Suggestions:
- With fresh bread or warm polenta
- You can add a spoonful of sour cream for extra richness
- For added protein, include cooked beans or chickpeas
🧆 Roasted Pepper Hummus
A delicious and flavorful version of classic hummus, with a slightly smoky taste due to the roasted peppers. It’s perfect as a snack, appetizer, or even as a topping for salads or sandwiches. The roasted pepper adds a sweet note and a contrast in texture, which blends perfectly with the creaminess of the hummus. 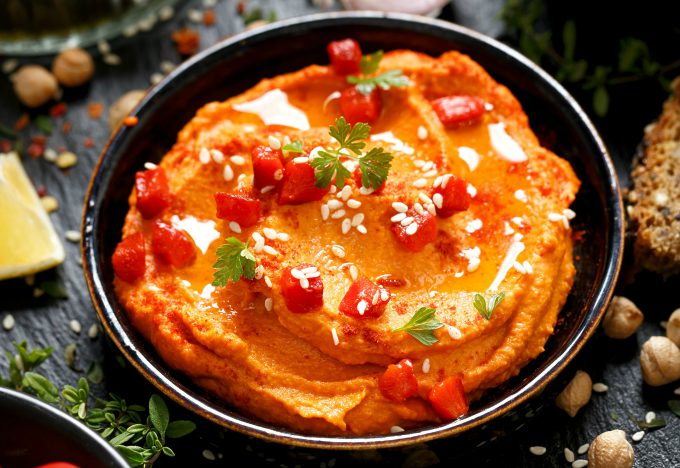
🛒 Ingredients:
- 🧆 250 g cooked chickpeas (or 1 can of chickpeas)
- 🫑 2 bell peppers (red or yellow)
- 🧄 1 garlic clove
- 🍋 Juice from 1 lemon
- 🥄 2 tablespoons tahini (sesame paste)
- 🫒 2 tablespoons olive oil (plus a little extra for garnish)
- 🧂 Salt and pepper to taste
- 🥄 1 teaspoon ground cumin (optional)
- 🌿 Fresh parsley (for garnish)
👩🍳 Preparation Method:
- Roast the peppers:
- Grill or pan-fry the peppers until their skin slightly darkens and becomes spongy (about 15-20 minutes). Then, place them in a plastic bag and let them cool to make peeling easier. Peel off the skin and cut the peppers into large pieces.
- Prepare the hummus:
- In a blender or food processor, add the cooked chickpeas, garlic, tahini, lemon juice, olive oil, roasted peppers, cumin (if using), and a pinch of salt and pepper. Blend everything until you get a smooth and creamy paste. If it’s too thick, add a little water or more olive oil.
- Adjust the taste:
- Taste and add more salt, pepper, or lemon juice if needed.
- Serve:
- Transfer the hummus to a bowl, garnish with fresh chopped parsley, and drizzle with olive oil. You can also add toasted sesame seeds for an extra crunch.
🍽️ Serving Suggestions:
- As a dip for raw vegetables (carrots, cucumbers, celery)
- With warm pita or flatbreads
- On toast or crackers for a quick breakfast or snack
It’s a wonderful combination of sweet and salty flavors, perfect for any time of the day!
🍢 Vegetable Skewers with Peppers
Vegetable skewers are a healthy and delicious choice, perfect for grilling or cooking on the stove. They are full of color, flavor, and vitamins, and the addition of peppers gives them a sweet taste and crunchy texture. They are ideal for a light meal or as a side dish for meat dishes. Vegetable Skewers with Peppers.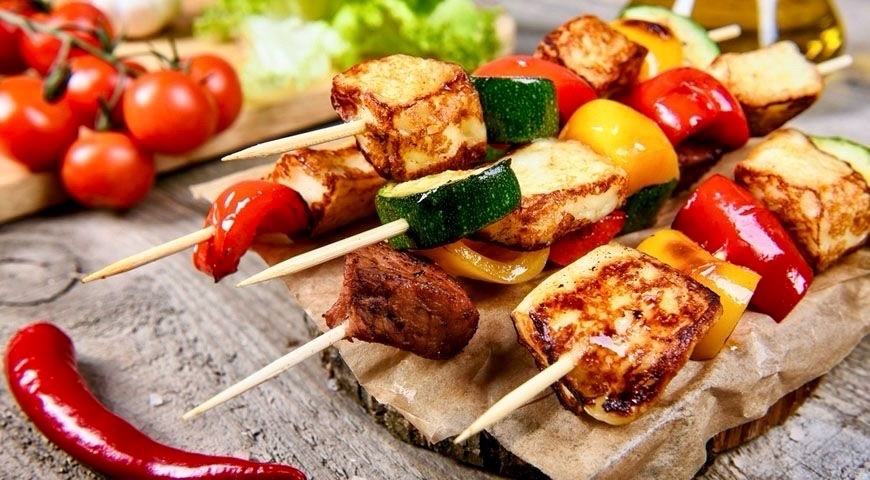
🛒 Ingredients:
- 🧅 1 large onion, cut into large pieces
- 🫑 2 bell peppers (red, yellow, or green), cut into large pieces
- 🍆 1 medium eggplant, cut into pieces
- 🥒 1 zucchini, sliced into rounds
- 🍅 2 large tomatoes, cut in half or quarters
- 🧄 2-3 garlic cloves, chopped
- 🫒 3 tablespoons olive oil
- 🌿 1 teaspoon dried oregano or rosemary (or both)
- 🧂 Salt and pepper to taste
- 🍋 Lemon juice (for marinade)
👩🍳 Preparation Method:
- Prepare the vegetables:
- Wash all the vegetables and cut them into large pieces, so they are easy to skewer.
- The marinade:
- In a small bowl, combine the olive oil, chopped garlic, oregano or rosemary, salt, pepper, and lemon juice. Mix well to create an even marinade.
- Assemble the skewers:
- Thread the vegetables onto the skewers, alternating between the different types of vegetables (peppers, onion, zucchini, eggplant, tomatoes). Ensure that all vegetables are evenly distributed on each skewer.
- Grill or pan-fry:
- If using a grill, preheat it to medium heat. Brush the skewers with a little oil and place them on the grill. Cook for 10-12 minutes, turning occasionally to brown evenly. If using a pan, heat a little oil and pan-fry the skewers on medium heat, cooking for 3-4 minutes on each side until the vegetables are tender and slightly browned.
- Serve:
- Once the skewers are ready, transfer them to a platter and serve them hot.
🍽️ Serving Suggestions:
- You can serve the vegetable skewers with tzatziki sauce or hummus.
- They are perfect alongside a portion of rice or quinoa.
- They can be added to a mezze platter or even on a fresh salad.
These skewers are a versatile and tasty option, perfect for a light meal or a summer dinner!